
Much like your human heart keeps blood circulating through the body, the WordPress Heartbeat API works to regularly sync data between your server and the browser. While it may sound like something you shouldn’t mess with, it’s vital to manage this heartbeat properly to keep your website running efficiently.
What is the WordPress Heartbeat
The Heartbeat API first popped up in WordPress 3.6 to improve real-time communications between a user’s browser and the server. The term “heartbeat” came about since it happens at periodic intervals, much like a pulse, though each interval is called a tick.
These periodic HTTP requests are sent as often as every 15 seconds, though you’re able to adjust it to a timing that fits best for your site. Depending on your site setup, the average time ranges from 15 to 60 seconds. This ensures edits made to various posts and pages are saved, just in case something happens, such as accidentally closing a browser window or a device crashing in the middle of a post.
The overall process by default is three simple steps:
- On the browser side, fields are added to the data to be sent via JQuery event (uses the
heartbeat-sendevent) - On the server side, the data is received and an admin-ajax handle prepares and filters the response, sending it back in a JSON format (uses the
heartbeat-receivedfilter) - The client then receives the response (uses
heartbeat-tick)
So yes, the WordPress Heartbeat is beneficial. We’ve all had those moments when the heartbeat’s auto-save has saved us when devices or browsers betrayed us.
But, it’s not just about editing posts and pages. The Heartbeat API also handles several other major functions, such as:
- WP cron jobs, such as publishing scheduled posts, running backups, checking for updates, etc.
- Notifying users a post is locked when someone else is editing it to prevent overlapping edits
- Providing real-time data updates in the WordPress dashboard, such as session expiration warnings and plugin notifications
All of these things keep your site running smoothly. But, too much of a good thing could cause your site to grind to an unexpected halt.
How Does Heartbeat Affect WordPress Site Performance
On many sites, you may never notice any negative impact from the WordPress Heartbeat API. This is especially true if you don’t have numerous users logging in at once, high traffic, or simultaneous editing for posts and pages.
But, if you’re starting to notice issues with your users being able to access your site, especially areas that require them to log in or make changes, or your site’s backend continuously gets more sluggish no matter what else you do, the Heartbeat could be an issue.
To better understand how this important feature could harm your site’s performance, it’s important to consider your site’s resources.
Since every heartbeat or pulse generates an AJAX request, your server needs the resources to handle those requests. The more users logging in and making changes, the more frequent the requests. If you don’t have sufficient resources, your server gets overloaded and your site performance suffers.
For backend issues, you’ll typically notice loading issues when you try to navigate the dashboard or edit posts/pages. Thanks to the Heartbeat’s background activity, there’s more going on with your site than you might realize.
Yes, it seems like you’re just doing some basic maintenance or content creation. But, if the Heartbeat is also taking care of updates, edits from other users, cron jobs, and more, your one extra task may be creating more requests than your server is prepared to take on.
It’s also a good idea to consider your hosting. If you’re not expecting traffic in the millions and thousands of members logging in, shared hosting might be fine. Just remember, shared hosting is shared among other sites on the same server. If the WordPress Heartbeat API starts hogging too many resources, your host might start throttling your site.
Effectively Manage the WordPress Heartbeat
There are many ways to manage the WordPress Heartbeat, but using a plugin is the easiest way, especially if you’re not comfortable editing code that could break your site if not done correctly.
Note: no matter how you decide to manage it, always back up your WordPress site before making any major changes.
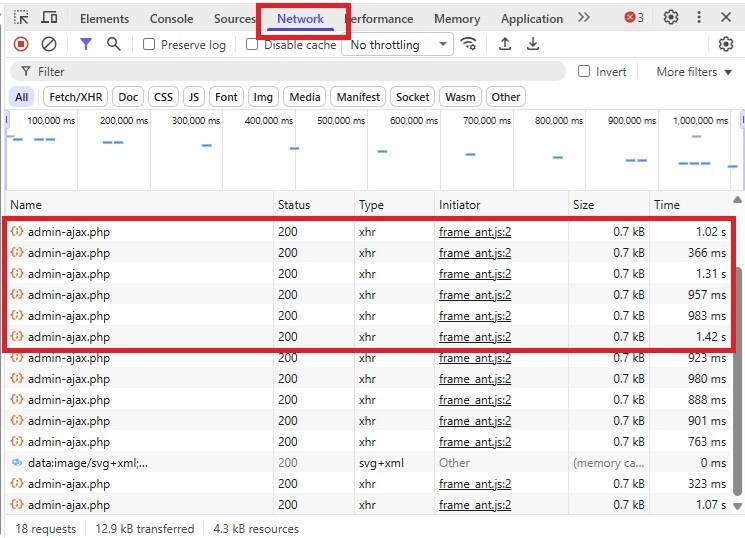
If you’re not sure if the Heartbeat API is even running on your site, there’s a quick way to check. Open your site’s dashboard, editor window, or an admin page in your browser. Press F12 to open your browser’s developer tools window.
Click the Network tab and look for periodic admin-ajax.php requests. If these happen regularly, the Heartbeat API is running.
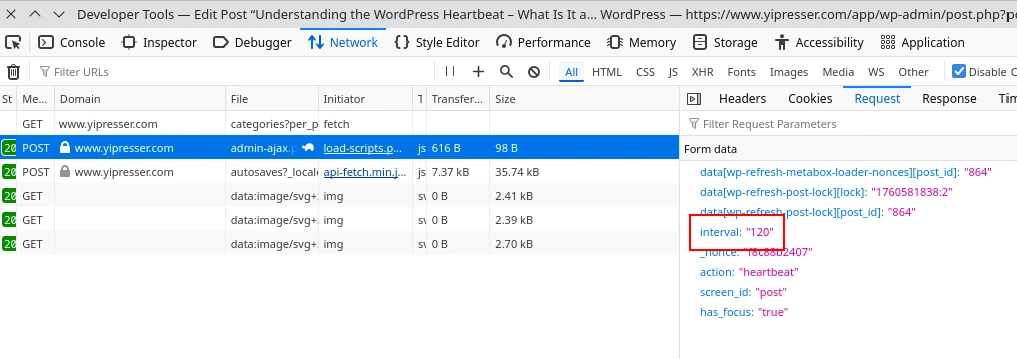
Now, click on any of the “admin-ajax.php” entry and look at the Request Headers. You should be able to find an Interval field. This is your heartbeat interval.
Manage WordPress Heartbeat Via Plugin
Let’s start with the easiest option – a plugin. You could opt for a plugin that’s just for managing the Heartbeat API. However, it’s easy to fill your site with numerous plugins that only manage one or two aspects of your site.
Too many plugins lead to WordPress site performance issues. Plus, more plugins mean more updates. This also means more possible vulnerabilities for your site.
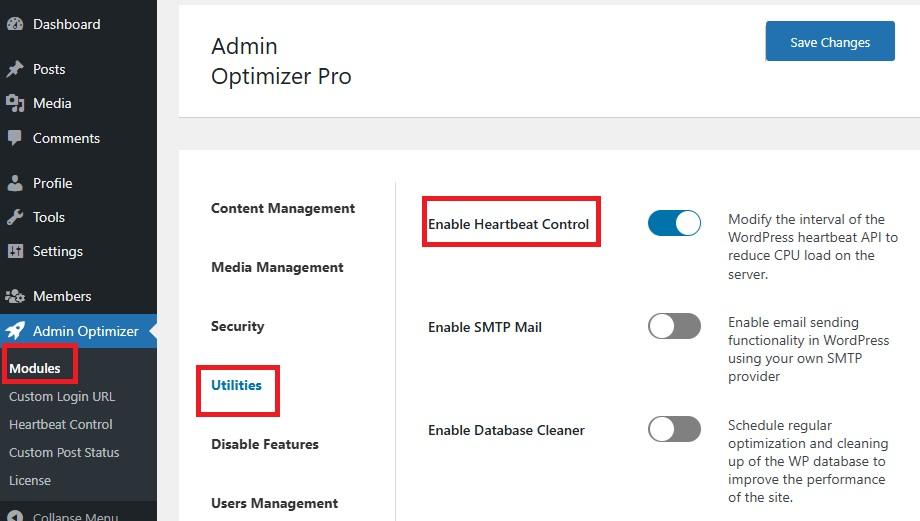
Ideally, choose a plugin that lets you manage multiple aspects of your site, consolidating a handful of plugins into one. It’s easier to install, update, and manage. Admin Optimizer is an all-in-one optimization plugin with multiple modules. You only have to enable the modules you want and need.
It’s simple to use. Open Admin Optimizer in your WordPress dashboard. Select Modules -> Utilities -> Enable Heartbeat Control.
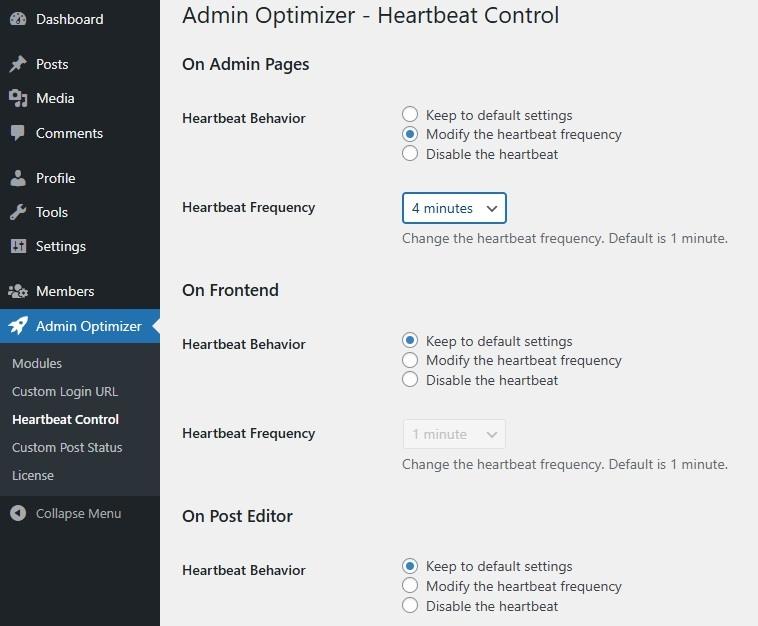
Go back to Admin Optimizer in your dashboard sidebar menu and select Heartbeat Control.
You have three different areas to manage the WordPress Heartbeat:
- Admin pages
- Frontend
- Post editor
Each area includes the following settings:
- Keep to default settings, which is one minute (ideal if you’re not experiencing any performance issues with that area of your site)
- Modify the heartbeat frequency – If you choose this option, use the drop-down box beside Heartbeat frequency to choose a value between 15 seconds and five minutes. This time can be different for each area of your site.
- Disable the heartbeat
Click Save changes when you’re done.
Manage WordPress Heartbeat Via Code
If you prefer to skip the plugin and use manual code, you’ll need to open your current theme’s functions.php file. Add the following code to the end of the file.
To disable the WordPress Heartbeat completely, use the following:
function wb_stop_heartbeat() {
    wp_deregister_script('heartbeat');
}
add_action( 'init', 'wb_stop_heartbeat', 1);Code language: PHP (php)
If you just want to disable specific features, such as autosave, try the following snippet:
function disable_autosave() {
    wp_deregister_script('autosave');
}
add_action('admin_init', 'disable_autosave');Code language: PHP (php)
The best option is to adjust the frequency. Change the interval to the number of seconds you want. The following sets the frequency to one minute:
function wb_set_heartbeat_time_interval( $settings ) {
    $settings['interval'] = 60;
    return $settings;
}
add_filter( 'heartbeat_settings', 'wb_set_heartbeat_time_interval' );Code language: PHP (php)
One thing to remember is when you update your theme, your code changes may be deleted. Keep a copy of what you’ve added so you can easily update your code again if needed.
What to Consider Before Making Changes?
Before you make changes, carefully consider how it may affect not only site performance, but the user experience.
For instance, if you have members logging in and creating posts on a regular basis, disabling the WordPress Heartbeat also disables the auto-save feature. This could lead to posts disappearing if a user doesn’t manually save before closing a tab or logging out.

If you set the frequency too often, you’ll increase the number of requests, which could cause worse performance issues. If the frequency isn’t often enough, you once again run into performance issues due to requests not happening as quickly as they should.
A few rules to remember to help you decide whether to disable or adjust the Heartbeat frequency:
- If you’re the only person managing and logging into the site, disabling it everywhere shouldn’t cause any real issues. Ideally, adjusting the frequency so the pulse doesn’t happen so often works best, though.
- If you’re only experiencing minor performance issues, limit the frequency. You may need to test different frequencies to see which works best for your site.
- If you’re constantly uploading or editing new content and/or have multiple users, consider disabling selectively. For instance, keep the WordPress Heartbeat active in the editor, but disable it in the dashboard itself. Remember, the Admin Optimizer plugin lets you set different frequencies as well for different areas.
Also, consider any other plugins you use. Some may depend on the Heartbeat API. Disabling it could break another plugin’s functionality.
For most sites, changing the frequency is all that’s really necessary to optimize site performance while still taking advantage of all the WordPress Heartbeat has to offer.