Overview
Custom Login URL lets you replace the default WordPress login address with a custom login slug.
How It Works
After configuration, visitors use the custom login URL. Direct access to default login endpoints can be blocked or redirected based on the saved settings.
When to Use It
Use it to reduce unwanted traffic to wp-login.php and make the login URL less obvious.
How to Enable
Go to Admin Optimizer > Security and enable Custom Login URL.
Setup Guide
- Go to Admin Optimizer > Security.
- Toggle the switch for Custom Login URL.
- Set the new Custom Login URL slug and the fallback Redirection Login URL slug.
- Recommended default configuration
Use a hard-to-guess slug for the login (e.g., portal-access) and set the redirection to 404 to hide the fact that WordPress is installed.
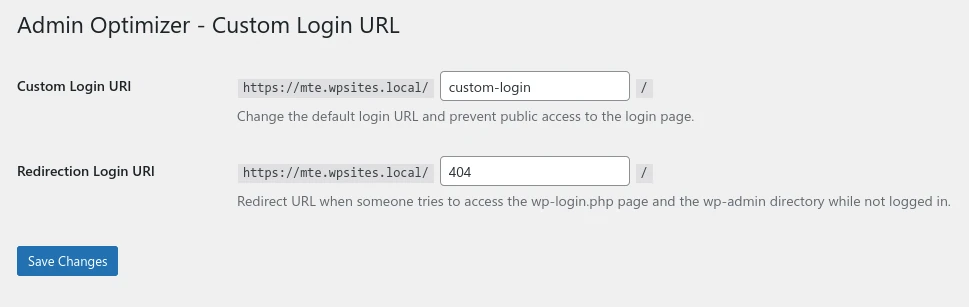
Step-by-step setup example
- Enable the module and open the Custom Login URL settings.
- Change the Custom Login URL slug to a custom value, like
my-secure-login. - Set the Redirection URL to a custom value, like
404. - Save the settings.
- Bookmark the new URL securely.
What the user should test after setup
In a private window, try visiting wp-login.php. It should redirect to 404. Then visit my-secure-login and ensure the login form appears.
Common mistakes or things to verify
Forgetting the new custom login URL and getting locked out. Always note the new URL before logging out.
Verify it’s Working
Try to access /wp-admin while logged out. You should be redirected away. Access your new slug and verify the login form is there.
Settings
- Custom Login URL: set the slug for the new login page. The default is
login. - Redirection Login URL: set where visitors are sent when they try to access
wp-login.phporwp-adminwhile logged out. The default is404.
Recovery Tip
If a team uses bookmarks, password managers, uptime checks, or external login links, update those references after changing the login slug.
Notes
Save the new login URL somewhere safe before logging out. On multisite, verify the behavior on the relevant site context.